
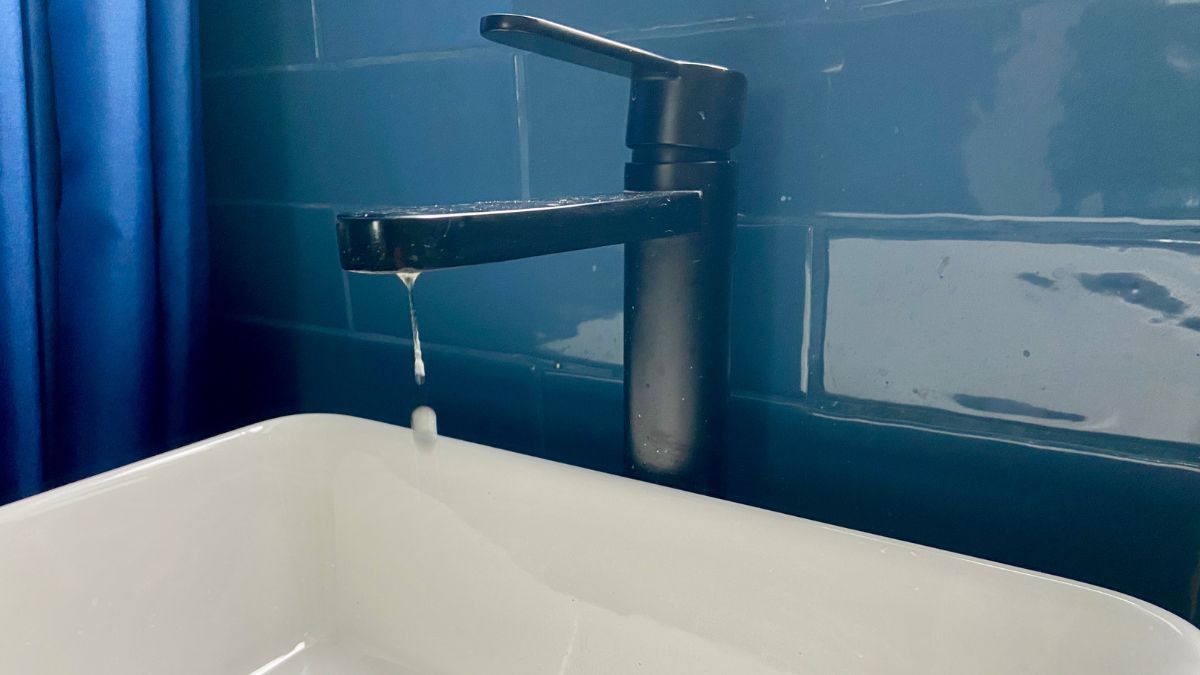
Dealing with a leaky tap can be both frustrating and wasteful, as even a small drip can lead to significant water loss over time. Fortunately, repairing a leaky tap is a straightforward task that can be tackled by almost anyone with basic tools and a little patience. In this guide, we’ll walk you through the step-by-step process of identifying the cause of the leak and fixing it, helping you save water, money, and the environment. Whether you’re a seasoned DIY enthusiast or a beginner, you’ll find everything you need to know to restore your tap to perfect working order.
Identifying the Source of a Leaky Tap
Before you can fix a leaky tap, you need to determine where the leak is coming from. Here’s a systematic approach to identifying the source of the leak:
- Inspect the Tap: Begin by closely examining the tap. Look for visible signs of water leakage around the base, spout, or handles. Note any water pooling or dripping.
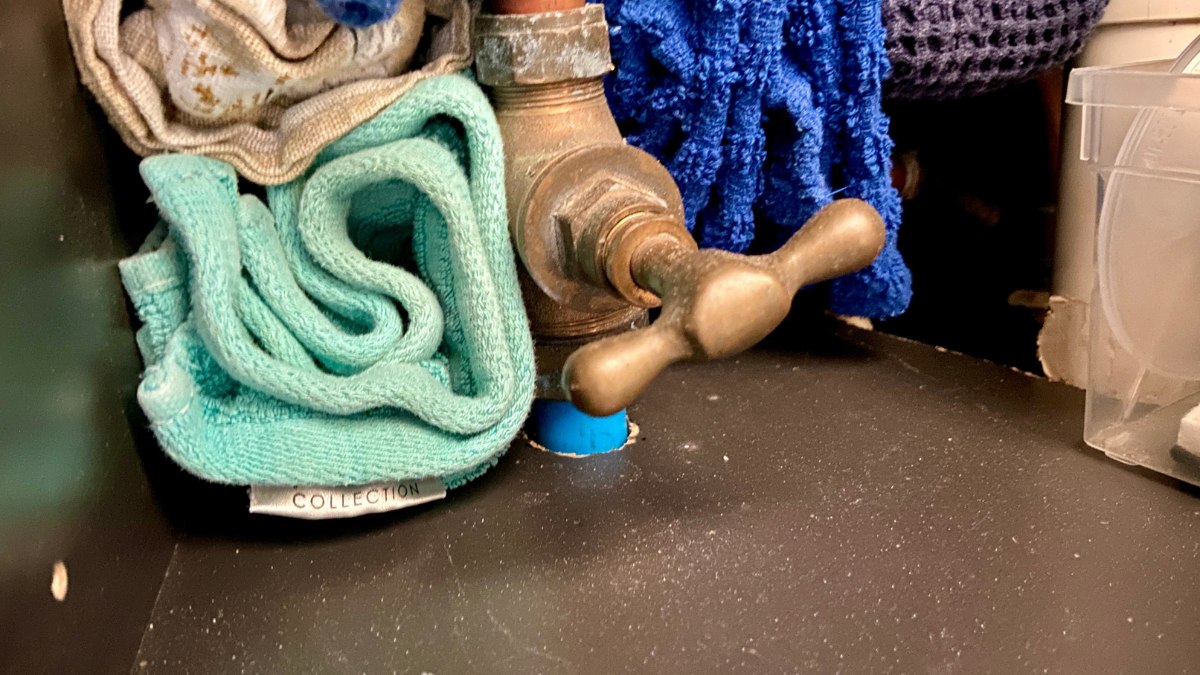
- Turn Off the Water Supply: Locate the shut-off valves under the sink and turn them clockwise to close them. This will prevent water flow while you inspect the tap further.
- Check the O-Rings: The O-rings are small rubber rings that create a watertight seal. Over time, they can wear out or become damaged. Remove the handle of the tap and inspect the O-rings for any signs of wear or cracks. Replace them if necessary.
- Examine the Washer: The washer is another common culprit for leaks, especially in older taps. It’s located at the bottom of the tap and can become worn out or hardened. To check the washer, you’ll need to disassemble the tap body. If the washer appears damaged, replacing it should stop the leak.
- Look at the Cartridge or Valve: In modern taps, a cartridge or ceramic disc valve controls water flow. These components can also wear out or get damaged over time. Remove the cartridge or valve and inspect it for any signs of wear or damage. If necessary, replace it with a new one.
- Check for Loose Parts: Sometimes, a loose screw or fitting can cause leaks. Ensure all parts of the tap are tightly secured. Use a wrench to tighten any loose fittings, but be careful not to over-tighten, as this can cause further damage.
In many cases it can be easier and cheaper to replace a leaky tap. So even if you can identify the leak in an existing tap you might not be able to find the correct parts to replace and repair the tap. In this case, finding a replacement tap can often be the best course of action.
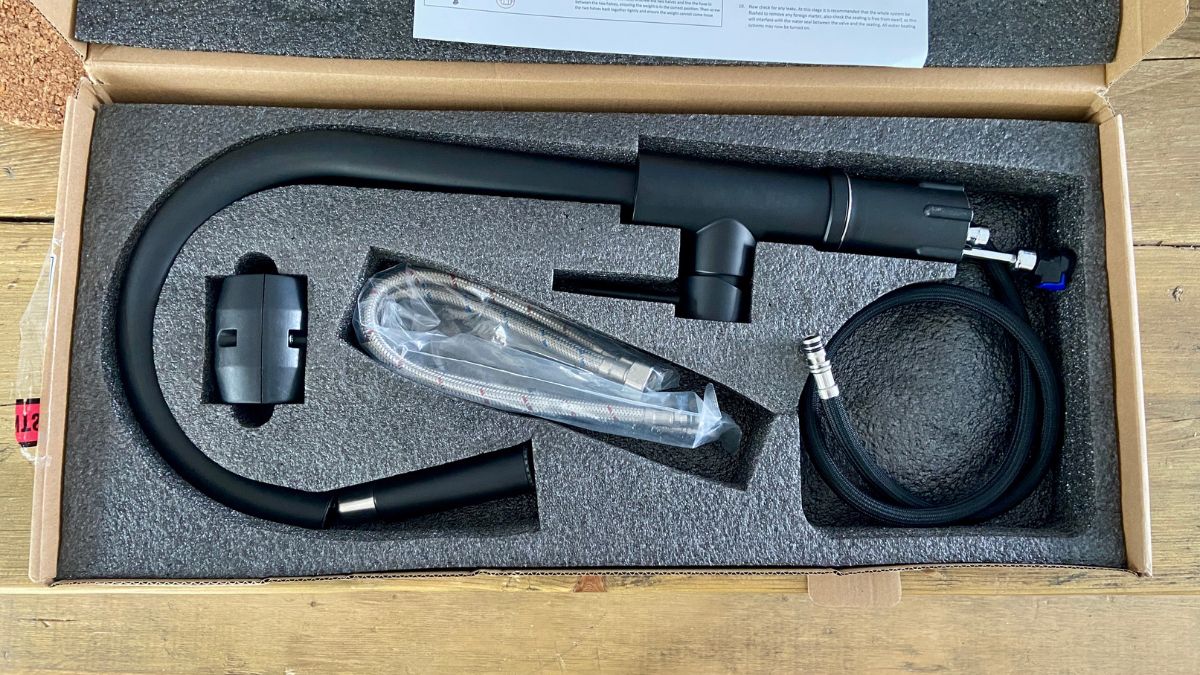
You might be able to find a like-for-like replacement or you you might decide to replace the tap for another design. When selecting a different tap, ensure the dimensions are similar to the existing one so that water is still directed to the correct place within the sink or basin. Check for height, depth and pressure rating.
How to Replace a Leaky Tap
If your leaky tap is beyond repair or you prefer a new one, replacing it is a practical solution. Follow these steps to replace a leaky tap:
- Gather Your Tools and Materials:
- New tap
- Adjustable wrench
- Basin wrench
- Plumber’s tape (Teflon tape)
- Bucket
- Towels
- Cleaning supplies
- Turn Off the Water Supply: Start by turning off the water supply to the tap. Locate the shut-off valves under the sink and turn them clockwise until fully closed. Open the tap to let any remaining water drain out.
- Disconnect the Supply Lines: Place a bucket under the sink to catch any water that might spill. Use an adjustable wrench to loosen the nuts connecting the water supply lines to the tap. Carefully detach the supply lines and set them aside.
- Remove the Old Tap:
- Use a basin wrench to loosen and remove the nuts securing the tap to the sink. These are typically located underneath the sink.
- Once the nuts are removed, lift the old tap out from the top of the sink. Clean the area where the tap was installed to remove any old sealant or debris.
- Install the New Tap:
- Follow the manufacturer’s instructions for assembling your new tap.
- Place the new tap into the mounting holes on the sink. Ensure it is correctly aligned.
- From underneath the sink, secure the tap by tightening the mounting nuts with a basin wrench. Ensure the tap is firmly in place but avoid over-tightening, which can damage the sink or the tap.
- Connect the Supply Lines:
- Apply plumber’s tape to the threads of the new tap’s connectors to ensure a watertight seal.
- Reattach the water supply lines to the connectors on the new tap. Use an adjustable wrench to tighten the connections securely.
- Turn On the Water Supply:
- Slowly turn the shut-off valves counterclockwise to restore the water supply.
- Open the new tap to check for any leaks. If you notice any leaks, tighten the connections further or apply more plumber’s tape as needed.
- Check for Proper Functioning: Once everything is secured and there are no leaks, test the new tap by running both hot and cold water. Ensure the water flows smoothly and the tap handles operate correctly.
Turning Off the Water Supply and Understanding Tap Valves
Before replacing a leaky tap, it’s crucial to turn off the water supply to prevent any unwanted spills or floods. Here’s how to do it:
Turning Off the Mains Water from the Stopcock
- Locate the Stopcock: The stopcock is usually found under the kitchen sink, in the bathroom, or sometimes in a utility room. It’s a valve that controls the flow of water from the mains supply into your home.
- Turn Off the Stopcock: Turn the stopcock valve clockwise to shut off the water supply. Make sure the water is completely turned off by turning on a tap; if no water flows out, the supply is successfully shut off.
With the water supply turned off, you can now safely work on the tap. Understanding the type of valve used in your tap is essential for effective repair or replacement. There are several types of valves commonly found in taps:
Valves for Two Handle Taps

- Quarter Turn Tap Valves:
- Replacement Basin Valves: These valves are designed for taps with separate handles for hot and cold water. They open and close with a quarter turn.
- Handed Valves Sold in Pairs: One valve opens clockwise, and the other opens anti-clockwise.
- Available Sizes: 1/2″ and 3/4″ BSP thread sizes.
- Upper Threads: All valves have M24 upper threads to fit any type of shroud or cover.
- Compression (Rubber Washer) Tap Valves:
- Replacement Compression Valve: These valves use a rubber washer to control water flow and are opened and closed by turning the handle multiple times.
- Single Valves: The same valve can be fitted to either the hot or cold side as they open in the same direction.
- Available Sizes: 3/8″, 1/2″, and 3/4″ BSP thread sizes.
Ceramic Disk Cartridges for Single Lever Taps
- Ceramic Disk Cartridges: These are replacement cartridges for single lever taps, providing smooth operation and durability.
- Available Sizes: 25mm, 35mm, 40mm, 45mm, and 47mm in diameter.

Which Valve Do You Need?
To determine the correct replacement valve for your tap:
- Remove and Measure: Remove your current valve and measure its size.
- Match the Size: Look for the matching size in our range. Alternatively, visit our Identification Page or search for your Valve by Brand.
- Use Our Resources: We also provide a helpful video for further guidance.
Maintenance Tip
When servicing your tap, we recommend using silicone grease. This helps the parts fit smoothly together and prevents wear and damage, ensuring a longer lifespan for your tap.
By turning off the water supply and understanding the different types of tap valves, you can confidently proceed with replacing or repairing your leaky tap.
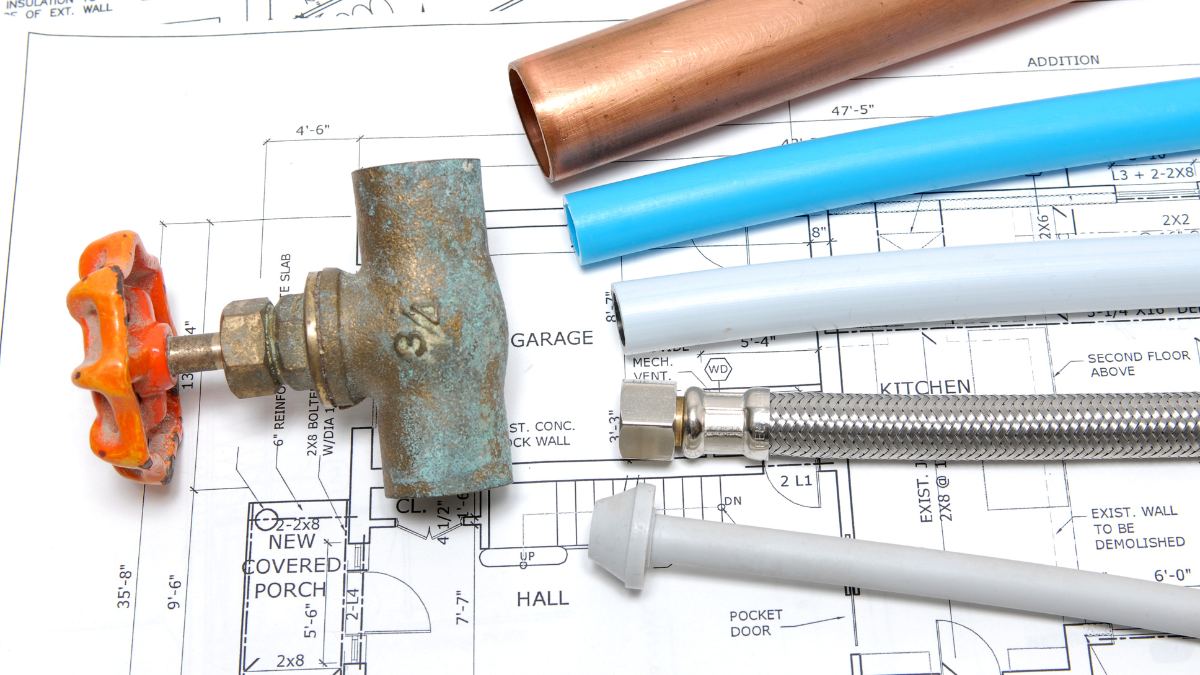
Understanding Different Pipe Sizes for Water Feeds
Plumbing pipes come in various sizes, each suited for specific applications depending on the volume of water they need to handle. Here’s a quick guide to the most common pipe sizes and where you might find them:
Domestic Plumbing
- 15mm Pipes:
- Usage: These are the most common pipes used for internal water supply in domestic properties.
- Location: Typically found in connections to taps, showers, and other fixtures that require a moderate flow of water.
- 22mm Pipes:
- Usage: Used for main water supply lines within homes.
- Location: Commonly found feeding multiple fixtures, such as from the mains to the central heating system or the hot water cylinder, ensuring a higher flow rate.
Commercial Plumbing
- 28mm Pipes:
- Usage: Larger diameter pipes necessary for commercial environments where the water demand is higher.
- Location: Often found in commercial buildings, such as offices, restaurants, and industrial facilities, where they handle a greater volume of water daily.
In summary, the size of plumbing pipes is typically measured by their diameter. Domestic properties often use 15mm and 22mm pipes to meet everyday water needs, while commercial properties require larger 28mm pipes to accommodate the increased water flow necessary for various business operations. Understanding these differences helps ensure the correct pipe size is used for efficient water distribution and system performance.
Replacing Pipework for Your Taps
Plastic vs. Copper Pipes: Which Is Best for Your Home?
If ever there was a topic to ruffle plumbers’ feathers, it’s the age-old debate of copper pipes vs. plastic pipes. Some swear by copper for its durability, while others prefer the speed and ease of using plastic piping. But which is best for your home? Let’s delve into the pros and cons of each, with insights from our team of experts.
Benefits of Plastic Piping
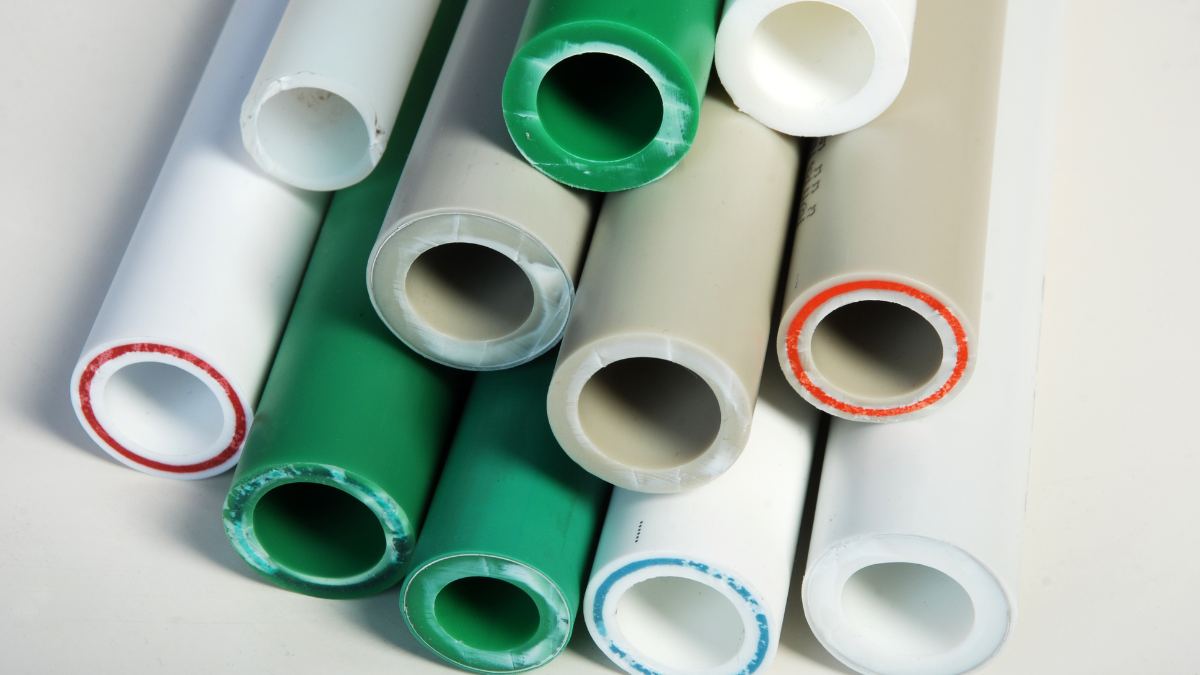
Plastic piping is fast becoming the go-to choice in modern plumbing, and it’s easy to see why, given its range of benefits:
- Corrosion Resistance: Plastic pipes don’t corrode over time, ensuring a longer lifespan and fewer maintenance issues.
- Reduced Installation Time: Installation time is reduced by around 40%, thanks to the simplicity of the push-fit fittings.
- Ease of Use: Push-fit fittings lock (or unlock in case of a problem) into place quickly and easily.
- Technological Advancements: Continuous improvements in technology make plastic pipes stronger, quicker to install, and more reliable.
- Cost-Effective: Plastic pipes are generally cheaper to buy than copper.
- Quiet Operation: Being thicker, plastic pipes are quieter as water flows through them.
- Freeze Resistance: They are less likely to freeze compared to copper pipes.
- Lightweight and Durable: Plastic pipes are lightweight yet extremely durable, making them easy to handle and install.
Cons of Plastic Piping:
- Flexibility at Joints: Plastic is less flexible at joints compared to copper.
- Potential Brittleness: Plastic may crack or become brittle over time, especially under certain conditions.
- Space Considerations: Plastic pipes may not fit into tighter spaces as easily as copper pipes.
Benefits of Copper Piping
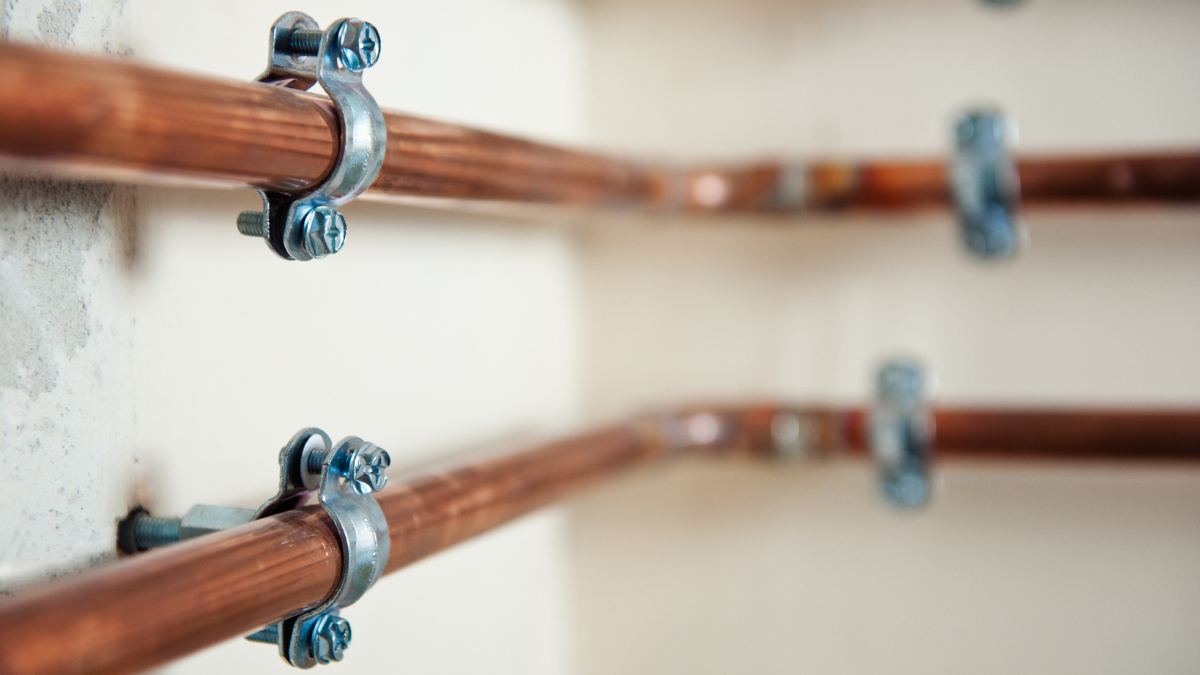
Before plastic, there was copper, a tried-and-true material for plumbing. Here are the pros and cons of traditional copper piping:
- Flexibility: Copper is more flexible than plastic, making it easier to work with in tight spaces.
- Recyclability: Copper can be recycled, making it an environmentally friendly option.
- Natural Material: Being a naturally occurring metal, copper doesn’t contain the chemicals found in some plastics.
- Chemical-Free: Unlike PVC, copper pipes do not contain any potentially harmful chemicals.
Cons of Copper Piping:
- Installation Complexity: Copper pipes require soldering to install, which typically limits their installation to professionals.
- Noise: Copper pipes can be noisier, especially with high-pressure systems.
- Cost: Copper is more expensive than plastic.
- Installation Time: Installing copper pipes takes longer than plastic.
- Corrosion: Over time, copper pipes can develop pinhole leaks and corrosion.
Can You Mix Plastic and Copper Plumbing?
Absolutely. Manufacturers like JG Speedfit have designed fittings that allow you to connect plastic and copper pipes seamlessly, making both materials compatible in a single plumbing system.
Should You Replace Copper Pipes with Plastic?
Not necessarily. If your existing copper pipes are functioning well, there’s no need to replace them. Consider switching to plastic only if your copper pipes need replacing or if you encounter frequent issues.
Life Expectancy of Copper Plumbing
When properly cared for and correctly installed, copper piping can last up to 50 years. However, they are susceptible to pinhole leaks and corrosion over time. If your copper pipes are old or require constant repair, you might want to consider switching to plastic piping.
Plastic or Copper Conclusion
While there has been a decline in the use of copper pipes in recent years, they remain a solid choice for many plumbers and homeowners. The decision often comes down to personal preference and specific needs. However, plastic piping is gaining popularity due to its strength, ease of installation, and efficiency, driven by modern technology. The future of plumbing seems to be leaning towards plastic, but copper still holds its ground as a reliable and trusted material.
Conclusion
When it comes to repairing or replacing a leaky tap, understanding the intricacies of plumbing materials and components is essential. Identifying the source of the leak, knowing how to turn off the mains water supply, and deciding between plastic and copper pipes are crucial steps in ensuring a successful repair or installation. Each material has its own set of advantages and drawbacks, and the best choice often depends on your specific needs and circumstances. Whether you opt for the longevity of copper or the modern convenience of plastic, being informed and prepared will help you make the best decision for your home.
